
Introduction
Cheesy Garlic Butter Corn on the Cob is the ultimate side dish, combining sweet, juicy corn with rich butter, fragrant garlic, and melty cheese. Whether grilled, roasted, or air-fried, this dish is perfect for BBQs, family gatherings, or a quick, satisfying snack. The combination of savory flavors and creamy textures makes it a crowd-pleaser for all ages.
Origin and Cultural Significance
Corn on the cob has been a staple food for centuries, particularly in North and South America, where maize was first cultivated by Indigenous peoples. Over time, various cultures have adapted corn-based dishes, incorporating regional flavors and techniques. In Mexico, elote (Mexican street corn) is famously slathered with butter, mayonnaise, cheese, and chili powder. This cheesy garlic butter version takes inspiration from classic buttery corn recipes while adding a rich, cheesy twist.
Ingredients & Quantity
- 4 ears of corn, husked
- 4 tbsp unsalted butter, melted
- 2 cloves garlic, minced
- ½ tsp salt
- ½ tsp black pepper
- ½ tsp paprika (optional)
- ¼ cup grated Parmesan cheese
- ¼ cup shredded mozzarella or cheddar cheese
Optional Additions
- Spicy Kick: A dash of cayenne pepper or red pepper flakes
- Herb Infusion: Chopped parsley, cilantro, or chives for freshness
- Citrus Zing: A squeeze of lime or lemon juice for brightness
- Creamy Twist: A drizzle of sour cream or a sprinkle of cotija cheese for a Mexican-style variation
Tips for Success
- Choose Fresh Corn: For the best flavor and juiciness, use fresh, in-season corn.
- Even Coating: Mix the melted butter and garlic well before brushing onto the corn.
- Grill for Extra Flavor: If grilling, allow the corn to develop a slight char for a smoky depth.
- Use Foil if Needed: Wrapping the corn in foil helps lock in moisture when baking or grilling.
- Melt Cheese at the End: Add cheese after cooking for the best melty texture.
Instructions
Grill Method:
- Preheat the Grill: Heat the grill to medium-high.
- Prepare the Corn: In a small bowl, mix melted butter, minced garlic, salt, pepper, and paprika.
- Brush and Grill: Brush the butter mixture onto the corn and place on the grill. Cook for about 10–12 minutes, turning occasionally.
- Add Cheese: Sprinkle Parmesan and shredded cheese over the hot corn and let it melt slightly. Serve immediately.
Oven Method:
- Preheat Oven: Set to 400°F (200°C).
- Prepare and Wrap: Brush the corn with the garlic butter mixture and wrap each ear in foil.
- Bake: Place on a baking sheet and bake for 20–25 minutes.
- Melt the Cheese: Unwrap, sprinkle with cheese, and broil for 2 minutes until melted.
Air Fryer Method:
- Preheat Air Fryer: Set to 375°F (190°C).
- Prepare Corn: Brush with the garlic butter mixture.
- Cook: Place in the air fryer basket and cook for 10–12 minutes, flipping halfway.
- Finish with Cheese: Sprinkle with cheese and air fry for 1 more minute to melt.
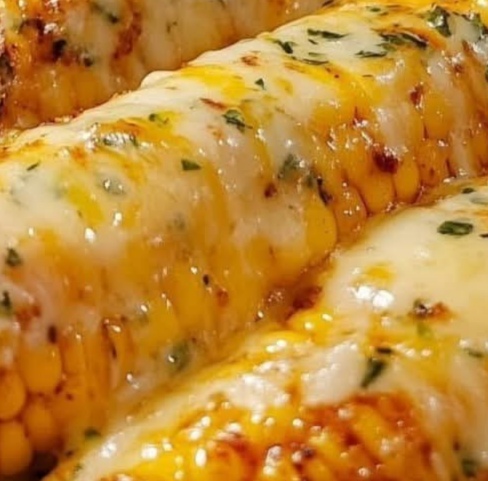
Description
This Cheesy Garlic Butter Corn on the Cob delivers a mouthwatering combination of rich, buttery garlic flavors and gooey, melty cheese. The contrast between the crisp-tender corn and the creamy, cheesy topping makes it an irresistible side dish.
Nutritional Information (Per Serving, Approximate)
- Calories: 220–250
- Protein: 6g
- Carbohydrates: 25g
- Fat: 12g
- Fiber: 3g
- Sodium: 400mg
Conclusion and Recommendation
Cheesy Garlic Butter Corn on the Cob is a versatile and satisfying dish that can be served alongside grilled meats, burgers, or as a fun snack on its own. It’s easy to customize and always a hit at gatherings.
Embracing Healthful Indulgence
For a lighter version, use olive oil instead of butter and reduce the cheese quantity. You can also swap out Parmesan for nutritional yeast for a dairy-free option while still getting that savory, umami flavor. This dish proves that indulgence and nutrition can go hand in hand—just enjoy it in moderation and savor every cheesy, garlicky bite!